Friday, August 17, 2012

Prepare for advance drawing

       If you ready to learn advance drawing. You may need more than your computer, keyboard and mouse. If you use mouse to draw, you may get only solid shape. What you want to do is find some hardware to help you draw. I use digital pen tablet. In my work place use genius 8x6 tablet, but I use lapazz H850 on my home, it's medium size of pen tablet.


       Today, tablet has many brand and size. Small, medium and large design for use to different work. For home use is small and medium, but you may use large size if you want. There're many type with different price sell on store. More size is more price, and more function is more expensive too. Choose tablet as you like available online, or shop at department near your home.

Next topic I'll teach advance work and I design to teach animation later.
Click here to Read more...

About layer

        If you design to draw picture with many things inside. I recommend to use layer for control your work. Each layer has its timeline. First, you draw picture on stage as you want. Then. when you want to add more layer click this button to insert layer, new layer will appear to your timeline.

Insert layer
You can change the name of your layer by double click on it and change. After that you can draw picture on new layer. You can drag layer up and down to order your picture.

You can rename the layer
For example, I draw room include wall, floor and some plant. I use 3 layer for drawing this picture.

I use 3 layers
My work.

If you have many layer and you want to edit only some layer. You can design to lock other layer, the locked layers can't do anything with it. Then you can edit unlocked layer and it will not disturb other layer.

Locked other layer
Edit my plant
Sometimes you can press this point to close  the eye, it will not show the layer that close. More easy to edit only layer that you want to show.

Try to close eye layer
It show only wall
Practice how to use layer to control your work when you muse draw many object in pictures. It's easy to control than you use many groups, objects or symbol in only one layer.

Next article I'll talk about prepare for advance drawing.
Click here to Read more...

Kinds of image

        Today, I'll explain about many kinds of image in my opinion. I divine it to 4 kinds of images in flash :
shape, object, group and symbol. There're many good points and week points with any kinds of it. I'll tell you step by step.

        1. Shape

       It's the original image when you draw everything on stage. Your draw will become a shape, shape may be only line, only fill or both line and fill. When you select shape, it will appear many dots on your selection.

Shape can use for make animation call "shape tween". Shape tween can change the shape and color, but it likely not tween as you want, sometimes it distorted.

If you draw 2 shapes or more and have some overlapped, it will combine to 1 shape. Be careful to draw, maybe it overlap and delete some important part, but you can apply to make shape as you want. Below are Example.

2 shapes circle and square
drag the square to overlapped the circle
drag it back the area in circle will deleted.
        2. Object

       Object is shape that can overlapped. If you draw more than 1 object, it will independently of one another. Object will not combine like shape. You can draw object by enable the draw object button (shortcut: J). After you enable that button, every draw of your shape will convert to object automatically. Combination your draw with object and shape.

Object can overlapped, it will not delete other.

       If you want to edit your object, you may click to select it and change color. You can use selection tool to pull your draw, and you can double click on object to edit inside it. Draw shape inside object as you want and double click anywhere for back to main scene from inside object. Avoid to draw object inside object. If you design to draw some object inside object, program will ask you to convert it to group when you come back to main scene, because object can use only shape in it. I'll talk about group below.

Select and change color

Pull it as you want


       If you want to change the order of object when you have more than 1 object, you can use shortcut "Ctrl + Up" and "Ctrl + Down" to edit.

Use Ctrl+Up and Ctrl+Down

Tips: you can break your object to shape by shortcut "Ctrl + B", after that it will change to shape.

Break it by Ctrl+B it will become to shape


        3. Group

        I often use this type for drawing, it's easy to control. First, you must draw picture with shape type. When you done drawing somethings, use selection tool to drag cover area of your picture to select it, then press Ctrl+G to group. Group can overlap with other group, you can change the order of group by shortcut "Ctrl + Up" and "Ctrl + Down" like object. To edit group that you already draw, you can double click on it and edit. After you finish edit, double click other point except your draw to come outside.

Group your drawing
Many group oranges, dishes and table

        Other way to create group, you can press Ctrl+G to create blank group, then start drawing to this group. You can create group in other group. For example, I have the group of human. Inside the human I have 4 groups head, body, arms and legs. Inside head has eyes and mouth.

Human has many groups inside

More group inside head


       4. Symbol

        Symbol is same of group but it use for animation. When you draw any shape, you can select it and press F8 to convert it to symbol. Program will ask you for set the name of symbol. There're 3 types of symbol graphic, movie clip and button. I'll explain about it later.

Tips: Group ,object, and symbol will always on top of shape.

Next article I'll talk about layer. :)
Click here to Read more...

Monday, September 19, 2011

Tool and shortcut that usually use.

Welcome back, today I will tell you about tool and shortcut that usually use, let's see these tools.


Hand tool (H) is mostly use for slide your area, it works like you use the scroll bar. Select this tool and click anywhere on stage then drag your mouse to any position like this.


Tips : you may use shortcut for hand tool by hold your spacebar on keyboard. Mouse cursor will temporary change to hand cursor, and you can use hand tool while you hold spacebar. 

Zoom tool (M) is mostly use for zoom your stage, it has 2 ways for use this tool.
First, select this tool and click your mouse on stage. Picture on stage area will zoom in for double size.


Tips : If you hold "Alt" on keyboard, zoom cursor will change from + to  -. Then if you click it will zoom out.

Next, select this tool and click then drag you mouse cover some area. Picture will zoom selected area fit to stage.


Tips : There are other ways to zoom your work as follow:
1. Use shortcut "Ctrl + +" on keyboard for zoom in.
2. Use shortcut "Ctrl + -" on keyboard for zoom out.
3. Hold "Ctrl" and "Shift" on keyboard and use scroll wheel on mouse for zoom in and out.
4. Use percentage box.


Tips : Shortcut that often use.
1. "Ctrl + Z" Undo your work.
2. "Ctrl + Y" Redo your work.
3. "Ctrl + S" Save your file.
4. "Ctrl + Shift + S" Save as your file.
5. "Ctrl + C" Copy the selection.
6. "Ctrl + V" Paste the selection.
7. "Ctrl + X" Cut the selection.
8. "Ctrl + D" Quick duplicate selection.
9. "Ctrl + Alt + S" Scale and rotate selection.
10. "Ctrl + B" Break apart. (talk about this later)

Hold "Ctrl" while select some selection and drag to other point = Copy.

"Ctrl + Shift + V" will paste the clipboard with original position. (original point when you copy)

Moreover, you can set your design shortcut under menu bar Edit > Keyboard Shortcuts.
Then duplicate your shortcut, and change shortcut for your style.


Attention : many shortcuts may mostly use by other command, be careful to change.

Hope it will help you work more faster :)

See me with next article, kinds of images. Thank you for your attention!
Click here to Read more...

Saturday, September 17, 2011

Begin drawing and understand each tool

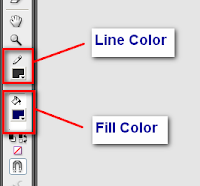
        At this moment, I’ll begin drawing picture along with learning about tools. First of all I must explain the format of flash picture. Flash picture will consist of line and fill, you can fill color into the close line. You may draw a line for guide and fill color where you want, or use only fill do not has line.


        Early to draw, please check that the object drawing button is disable, otherwise it will hard to control your drawing. (This button appear at the bottom of tool box when you choose any tools for drawing)

        The first tool I’ll talk about pen tool (shortcut: P). Pen tool used to draw a line; you can click at any point and click at other point to draw. If you click and drag the mouse, the line will curve not straight. To edit the line, you can use other point tool under pen tool to add, delete anchor point. Try to use and learn by yourself. 

        Next is line tool (N), click and drag the mouse to draw a line.


        You can use selection tool (V), to pull the line until you like. If you draw many overlap line, it will compound to the single object, please be careful with this point. But you can draw overlap object in the advance drawing that I’ll talk about this later.


        Next, these tool use for drawing a shape such as oval or rectangle. Pencil tool (Y) use for draw independent line, and brush tool (B) use for draw independent fill. You can choose the brush size too.


Try to draw any fill by brush tool; I’ll draw the mountain with the brown color.


Use subselection tool (A) to edit the fill. (also other tools)


You can use free transform tool (Q) to transform the picture by select any part that you want and transform it.


Now, I want to add some shadow in my mountain. I use the lasso tool (L) to select the area like the example picture, and change the color to dark brown.


Next, I want some sky and cloud. So, I select the rectangle tool with the black line and no fill. Draw a rectangle round the mountain.


Now, I draw a bird, but it’s not cute. :(


Then, I use eraser tool (E) to delete it. (or you design to use selection tool to select the bird and press delete on keyboard)


Let’s fill the sky by use paint bucket tool (K) select the blue color and fill it over the mountain. 


Now select the brown color with eyedropper tool (I) and fill at the bottom for the same color of brown. 


Next, I’ll use pencil tool to draw cloud with black line, and fill the cloud with white color.


But, I think the black line is not nice, then I select ink bottle tool (S) with the dark blue color and click at the cloud to change the line color.


Last, use text tool (T) to type some word and finish. I think you may know more about how to use each tool and how it works. ^_^


Next article, I’ll specific with some tool and shortcut that usually use, good luck for you.
Click here to Read more...