Monday, September 19, 2011

Tool and shortcut that usually use.

Welcome back, today I will tell you about tool and shortcut that usually use, let's see these tools.


Hand tool (H) is mostly use for slide your area, it works like you use the scroll bar. Select this tool and click anywhere on stage then drag your mouse to any position like this.


Tips : you may use shortcut for hand tool by hold your spacebar on keyboard. Mouse cursor will temporary change to hand cursor, and you can use hand tool while you hold spacebar. 

Zoom tool (M) is mostly use for zoom your stage, it has 2 ways for use this tool.
First, select this tool and click your mouse on stage. Picture on stage area will zoom in for double size.


Tips : If you hold "Alt" on keyboard, zoom cursor will change from + to  -. Then if you click it will zoom out.

Next, select this tool and click then drag you mouse cover some area. Picture will zoom selected area fit to stage.


Tips : There are other ways to zoom your work as follow:
1. Use shortcut "Ctrl + +" on keyboard for zoom in.
2. Use shortcut "Ctrl + -" on keyboard for zoom out.
3. Hold "Ctrl" and "Shift" on keyboard and use scroll wheel on mouse for zoom in and out.
4. Use percentage box.


Tips : Shortcut that often use.
1. "Ctrl + Z" Undo your work.
2. "Ctrl + Y" Redo your work.
3. "Ctrl + S" Save your file.
4. "Ctrl + Shift + S" Save as your file.
5. "Ctrl + C" Copy the selection.
6. "Ctrl + V" Paste the selection.
7. "Ctrl + X" Cut the selection.
8. "Ctrl + D" Quick duplicate selection.
9. "Ctrl + Alt + S" Scale and rotate selection.
10. "Ctrl + B" Break apart. (talk about this later)

Hold "Ctrl" while select some selection and drag to other point = Copy.

"Ctrl + Shift + V" will paste the clipboard with original position. (original point when you copy)

Moreover, you can set your design shortcut under menu bar Edit > Keyboard Shortcuts.
Then duplicate your shortcut, and change shortcut for your style.


Attention : many shortcuts may mostly use by other command, be careful to change.

Hope it will help you work more faster :)

See me with next article, kinds of images. Thank you for your attention!
Click here to Read more...

Saturday, September 17, 2011

Begin drawing and understand each tool

        At this moment, I’ll begin drawing picture along with learning about tools. First of all I must explain the format of flash picture. Flash picture will consist of line and fill, you can fill color into the close line. You may draw a line for guide and fill color where you want, or use only fill do not has line.


        Early to draw, please check that the object drawing button is disable, otherwise it will hard to control your drawing. (This button appear at the bottom of tool box when you choose any tools for drawing)

        The first tool I’ll talk about pen tool (shortcut: P). Pen tool used to draw a line; you can click at any point and click at other point to draw. If you click and drag the mouse, the line will curve not straight. To edit the line, you can use other point tool under pen tool to add, delete anchor point. Try to use and learn by yourself. 

        Next is line tool (N), click and drag the mouse to draw a line.


        You can use selection tool (V), to pull the line until you like. If you draw many overlap line, it will compound to the single object, please be careful with this point. But you can draw overlap object in the advance drawing that I’ll talk about this later.


        Next, these tool use for drawing a shape such as oval or rectangle. Pencil tool (Y) use for draw independent line, and brush tool (B) use for draw independent fill. You can choose the brush size too.


Try to draw any fill by brush tool; I’ll draw the mountain with the brown color.


Use subselection tool (A) to edit the fill. (also other tools)


You can use free transform tool (Q) to transform the picture by select any part that you want and transform it.


Now, I want to add some shadow in my mountain. I use the lasso tool (L) to select the area like the example picture, and change the color to dark brown.


Next, I want some sky and cloud. So, I select the rectangle tool with the black line and no fill. Draw a rectangle round the mountain.


Now, I draw a bird, but it’s not cute. :(


Then, I use eraser tool (E) to delete it. (or you design to use selection tool to select the bird and press delete on keyboard)


Let’s fill the sky by use paint bucket tool (K) select the blue color and fill it over the mountain. 


Now select the brown color with eyedropper tool (I) and fill at the bottom for the same color of brown. 


Next, I’ll use pencil tool to draw cloud with black line, and fill the cloud with white color.


But, I think the black line is not nice, then I select ink bottle tool (S) with the dark blue color and click at the cloud to change the line color.


Last, use text tool (T) to type some word and finish. I think you may know more about how to use each tool and how it works. ^_^


Next article, I’ll specific with some tool and shortcut that usually use, good luck for you.
Click here to Read more...

Flash Tools

        In my blog, I’ll use version of Adobe Flash CS3 for drawing. If you use other version of Adobe Flash such as Adobe Flash CS4 or above, Macromedia Flash 8 or Macromedia Flash MX. It may have some different tools, but it will resemble with this version. I’ll try to add pictures for explain you to understanding each tool.  First when you open the program, it will show you like home page. Program will ask you what you want to do, you can choose to open your recent work or create new file.


Tips : If you check the "Don't show again" box at the bottom left of this page, it will not show this page again in the future.

       Try to create new file, but you may choose action script version for use with your work. You can choose action script 2 or action script 3 as you like, I’ll not talk about action script at this time. However, I recommend you to choose action script 2 with your work, because it widely used in many places and easy for develop. When new file was created, you should see the page like this.


       The important section is stage, tools and color. The properties, timeline and library window are for advance use. The stage use for working, you must draw everything on this section. Tools use for choose tool that you want to use. Timeline section most use for make animation. Properties is option for customize your work. Color window use for choose color, and library window use for keep any object into it and you can pick object inside it out to use. Furthermore, there’re many windows that you can open for use it, you can find it under menu "window" on the top bar of program. Every window and section you can set the position of it as you please (by drag and drop your mouse). Now, let’s begin to the tool bar, I’ll tell you the brief of it.


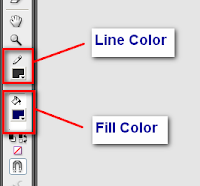
        Look at the tool bar you may see 4 parts of it. First part use for select, next use for drawing. Third, use for decorate and last is the other. You can see some options in the last part for customize your picture.
        Next article I'll talk about each tool of this tool box section, hope it will helpful for you. :)
Click here to Read more...

Tuesday, June 14, 2011

Know about Adobe Flash Program

Adobe Flash CS3
        Flash is the program for multimedia using with the original owner name of Macromedia. You may be heard the name of “Macromedia Flash” or “Shockwave Flash”. Later, Adobe Systems Incorporated announced a definitive agreement to acquire Macromedia in year 2005. All of Macromedia program such as Macromedia Flash or Macromedia Dreamweaver change the owner name to Adobe System Incorporated. 


Example web browser


        Adobe Flash program can support vector picture, and this picture can display on web browsers. Flash has the file extension of .fla for original working file that can open and edit, or .swf used for publish and display on Flash Player.


Flash player Icon
        There’re many types of Flash Player both online and offline. Online is Flash Player for web browser, and offline is Flash Player that can run on OS. Flash file has many good points; highlight of flash file is animation. You may see many websites use flash for make banner of the website and also used for advertisement, because it can make website more interesting. Moreover, you can write the code call flash action script in your work for command any objects. Action script most use with flash games, you may see it in many websites. 


        Another advantage is definition of picture because flash is vector file, then it different from bitmap picture. When resize or zoom in the picture, vector picture will has better definition than bitmap. If you’re looking for some program to use for drawing pictures, I recommend flash. You can develop your work from picture to animation, banner of website or advertisement. It simply to use flash for drawing any pictures, then it’s the reason why I choose flash for drawing. My blog “Cute Flash Drawing” will teach you the basic tool, how to draw basic object. However, my real purpose is how to make “the cute picture”, exchange my technique for make cute image. If you’re interesting to draw cute picture with me, you must prepare yourself by download Adobe Flash Program from adobe official website (www.adobe.com). The newest version is Adobe Flash Professional CS5.5; you can buy full software at the website or try to find another version from search engine. You may found another version with trial period; try downloading it for use if you want. When you ready for drawing, follow me to other articles which you want, thanks for reading and pay attention with my blog.


Click here to Read more...